

- https://www.ravenstarcosplay.com/2015/09/15/yennefer-of-vengerberg-dlc-costume-tutorial/
- https://fjalladis.de/en/making-of-2/yennefer-dlc-outfit-making-of/

So the fabrics you use will have to use your judgement on what you want to spend on it and how close you can get it to match. For me I got most of it on sale and the fabrics where around $60 CDN for me. I did later on add some more stuff which added another $20 CDN for the total cost. I also got some bias tape for the outside of the skirt, to cover the feathers on the top, and for the ribbons around the forearms. You will probably also need some Elastics to connect some parts together and to give you that movement you need. You need at least 3 different colours of thread, one being heavy duty for the corset. The wig, you can pick up from ebay. Just search "the witcher yennefer wig".
For the corset, this is based on what you want to do and what you are comfortable in. It is hard to find one that is similar to what Yennefer has, in addition to being affordable. So I opted to make my own instead due to I can control how it fits on me and its cheaper. I did buy a very close leather for the corset and boot covers. In addition I did get some leather string for the corset as well. I found that my local fabric store at them at a decent price and I could get the length that I wanted. You can get cheaper on ebay if you can't find the leather string at a location near you. You will also need a pattern if you don't buy it or have someone make it for you. I found this video helpful, in addition to one of the links I posted above.
For the feathers, I found some on Amazon that were affordable, but they took at least 1 MONTH AND 2 WEEKS to get here in Canada due to being stuck in customs. So order your feathers first and plan to wait awhile for them to arrive. Even if the seller has an express option, they CAN'T control how long customs holds them. I personally ordered 2 packages and that seemed to be enough plus extra. Here is a video on how to sew feathers on.
The necklace I ordered from Amazon as well and it arrived in good time. You can also order from ebay, but I personally like ordering from amazon when I can.

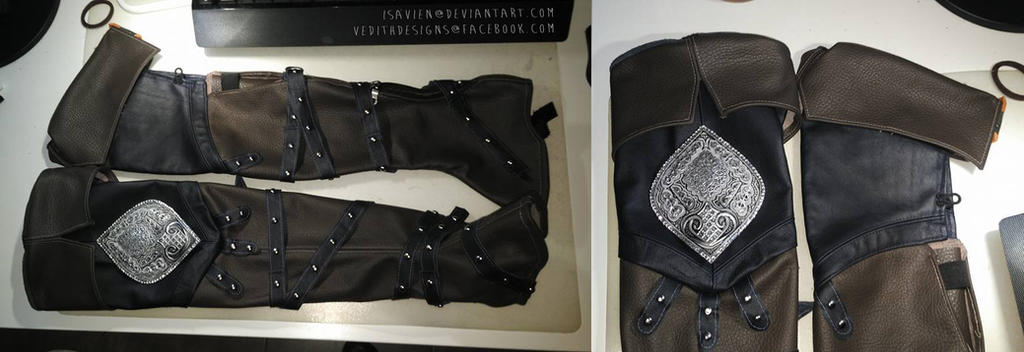 |
| image from https://www.deviantart.com/isavien/art/Yennefer-boots-WIP-609734834 |
Now the Boots. This is where you have to decide what you are comfortable with spending and wearing. You can choose to buy a pair of boots that are similar to what Yennefer wears, modify an existing pair, or make boot covers. I did a combination of boot covers and modify what I already had from my previous cosplay. I used the same fabric from the corset and used it to create the base for the boots covers to go onto of my existing boot. I had leftover black leather from a previous cosplay what I used for the top part and the black strips. You will need to buy some black leather like fabric for the boots covers if you plan on building it. The covers also require elastic for some movement and to keep it attached to the boot. For mine, the elastics went at the heel and under the boot. In addition to around the ankle so it is easier for me to put on. Please note that it is important for the cover itself to have space around the knee so you can still bend your knee and sit comfortably. I found with this way, I could still walk but I didn't have complete full range movement of my leg. As for the black strips, I sewed it in various places to hold it in place. You can use the image above as reference for placement.

For the arm bands, I got a black satin bais tape, about 1 - 1.5 meters and sewed the edges together to give me a solid band. For the runic symbols on the band, I choose to go with a white fabric paint from Michaels. I found that amazon didn't have much affordable options, you might want to go to your local craft store for this item. To paint it, all you really need is a thin paint brush which you can get from your local dollar store. For the runic symbols, I got an image from one of the link above that I posted in the beginning. I saved the image and used it for reference. Once painted and dried, you can sew it to the forearms of the costume. It is important to pin it in place while wearing it before you begin sewing to get that shape it has when you are wearing. You don't want it too tight and placed nicely. You will need an extra pair of hands to help you place it. You can also use the images to reference below on how it's placed on the arms. Once pinned, I hand sewed it in at various points to hold the shape and decrease the chances of it moving on me.


For the gloves, I just used the same fabric from the skirt and used this video tutorial to help me make it. Just give yourself extra time and space for these as it is tough to get it right. It can be either too baggy or too tight. Also remember that her gloves are a bit open at the bottom, so leave room for that when tracing. I didn't do much details on the gloves because I was running out of time and mine were a little tight around one of my fingers.
I hope this helps you when working on Yennefer's outfit for your cosplay. I am in no way a professional cosplayer, I just enjoy doing it once a year for Fan Expo and I know for someone trying to make it, guides do help give you an idea. I did have the help of a seamstress to make a lot of the parts, which is great if you are good at sewing or using a sewing machine. The price point for all the materials is about max $150 - 160 CDN. If you don't want to make it and looking for someone to make it, there is options on etsy, or you can use the link for reference when making the outfit as they do take a lot of photos from different angles. I will leave additional images below you can use for reference. Good luck!
 |
| My version of the outfit. |


No comments:
Post a Comment